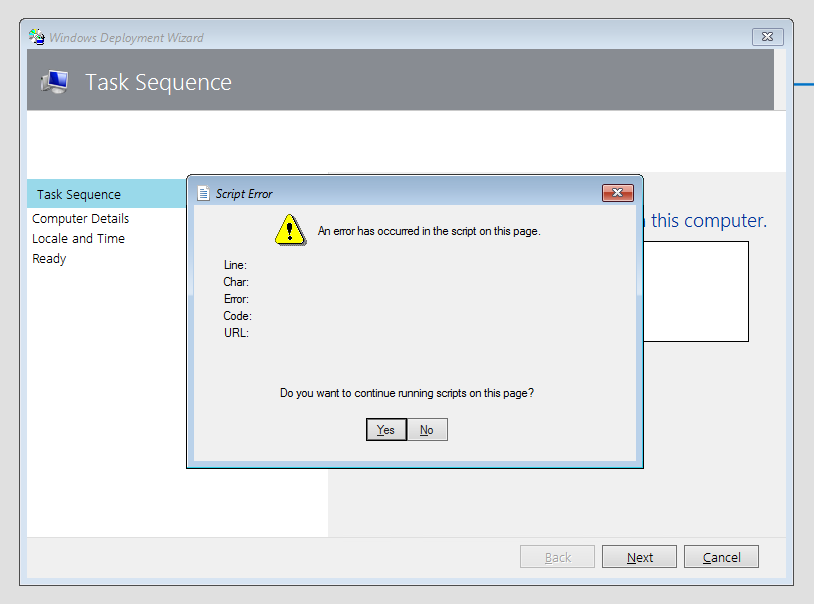
Script Error When Upgrading ADK To Windows 11

You may seen the above error when PXE booting images under the new Windows PE edition for Windows 11. Yes, frustrating right! Well this is what I did to fix the issue. Depending on how many WDS/MDT servers you have you may have to follow this multiple times.

First you will want to open a new Command Prompt “CMD” window in Administrator mode. Type in the following reg.exe add”HKLM\Software\Microsoft\Internet Explorer\Main” /t REG_DWORD /v JscriptReplacement /d 0 /f


Next Backup this C:\Program Files\Microsoft Deployment Toolkit\Templates\Unattend_PE_x64.xml file. Then edit the file with the code below and finally regenerate the entire WIM image. If you have more than one server you will have to follow these instructions again.

<unattend xmlns="urn:schemas-microsoft-com:unattend">
    <settings pass="windowsPE">
        <component name="Microsoft-Windows-Setup" processorArchitecture="amd64" publicKeyToken="31bf3856ad364e35" language="neutral" versionScope="nonSxS" xmlns:wcm="http://schemas.microsoft.com/WMIConfig/2002/State">
            <Display>
                <ColorDepth>32</ColorDepth>
                <HorizontalResolution>1024</HorizontalResolution>
                <RefreshRate>60</RefreshRate>
                <VerticalResolution>768</VerticalResolution>
            </Display>
            <RunSynchronous>
                <RunSynchronousCommand wcm:action="add">
                    <Description>Lite Touch PE</Description>
                    <Order>1</Order>
                    <Path>reg.exe add "HKLM\Software\Microsoft\Internet Explorer\Main" /t REG_DWORD /v JscriptReplacement /d 0 /f</Path>
                </RunSynchronousCommand>
                <RunSynchronousCommand wcm:action="add">
                    <Description>Lite Touch PE</Description>
                    <Order>2</Order>
                    <Path>wscript.exe X:\Deploy\Scripts\LiteTouch.wsf</Path>
                </RunSynchronousCommand>
            </RunSynchronous>
        </component>
    </settings>
</unattend>

Save Powershell Modules For Offline Storage

Just a quick How:To that came to mind


1. Open Powershell 5.1 or later
2. Determine a save location. In my example an SMB storage location will be used
3. If you are not sure of the name of the powershell module you are looking to save offline utilize the Find-Module *name* command. Under the name column will be the PSGallery name
4. Run the command Save-Module -Path “File location” -Name vmware.powercli. In the picture below you can see both step 3 & 4 shown as well as the progress when saving the module(s).

This device is already set up in another organization

If you have a device either in your possession or in the hands of a employee but you can’t seem to connect to intune. I found and tested this step to resolve an issue with a machine not connecting to our intune tenant no matter what I tried before.

As shown in the picture you need to browse to the registry location and remove all the GUID folders. Once removed try to sign-in through the intune/company portal app again and you should be successful

End Your Work Day With A Script

Trying to give myself things to learn with Powershell. I thought, “what’s a good way of forcing myself to disconnect from Teams/Slack as that shows me as available to the company I work for”. We’ll I came up with a little script that finds the time and then starts/stop services based -gt (greater than) times.

##################################################################
#   Scripts purpose is to stop you from working after 5:00 PM &  #
#   start service when you need to work                          #
##################################################################

#Get time
$OOP = Get-Date

#Strategy

if ($OOP -gt '5:00 PM') {
    Get-Process Teams, slack | Stop-Process -Force
}
elseif ($OOP -gt '8:00 AM') {
    Get-Process Teams, slack | Start-Process -Force
} 

A sample of the script is above ^. If you would like to automate this daily you would just have to simply open Task Scheduler and set up the script to run weekly with the preferred week days. Remember to set the application to powershell.exe -File “Path to script” in the variables of the task schedule. Two will be needed if you want to start and stop the day.

Setting Up WSL On Windows 11

Requirements

Guide to setup WSL

Enabling WSL

In the possibility that you do not have WSL enabled by default. I’ve listed a command below that can be run through an elevated PowerShell to enable that environment/program.

dism.exe /online /enable-feature /featurename:VirtualMachinePlatform /all /norestart

or

wsl –install (If you see WSL help text try and run wsl –list –online)

Enabling WSL Version 2

Restart your computer, sign back into your machine, and open another elevated Powershell prompt. Once open again run the command below.

wsl --set-default-version 2

WSL 2 requires an update to its kernel component. For information please visit https://aka.ms/wsl2kernel.

If you are are promted with the above message. Open this link -> WSL Kernel. Download and install the WSL kernel. Once the kernel is downloaded and installed run wsl --set-default-version 2 again.

Installing your favorite Distro

With Powershell 7 still open in admin mode run the command to change your distro

Run wsl –list –online before the below command so you can decide which distro you want to run virtually on your system.

wsl –install -d <Distribution Name> (Replace with the name of the distribution you would like to install.)


Fixing Microsoft’s Office 365 Navigation Bar

Lately, in technology news, Microsoft has made changes to the Office 365 Navigation Bar in Outlook making some users frustrated. Thankfully, with this post I have a set of steps below to identify the issue and fix it.

Image was captured from Microsoft’s Technet forum

Fixing The Navigation Bar

Here’s a list of steps to fix the navigation bar in Outlook for Office 365.

1. Close Microsoft Outlook
2. Open the Run box with WIN+R and enter outlook.exe /safe
3. Did not find the Outlook toggle – Coming Soon
4. Close the Outlook version running in safe mode
5. Reopen Outlook

Navigation Bar After The Fix

Image was captured from Microsoft’s Technet forum

Use Powershell to get Dot.Net Information

Below is a script that I had used to find the version of Micrsoft’s Dot Net Framework software. Sometimes you may not find the install version in control panel and you do have other ways to find it through reg or the properties of a DLL file. Why not do everything through Powershell though

Get-ChildItem 'HKLM:\SOFTWARE\Microsoft\NET Framework Setup\NDP' -recurse |
Get-ItemProperty -name Version,Release -EA 0 |
Where { $_.PSChildName -match '^(?!S)\p{L}'} |
Select PSChildName, Version, Release

With the script above… You can copy and paste that into a non-administrative Powershell ISE window. As shown below you will see what the script looks like pasted, ran, and what the output should look like

After running the above script and confirming it works for your use. You can then save as and save it under your script collection to run when needed. In my particular case I run this through SCCM on demand when I need to know what the .NET version is for the CAS, DP, MP, CMG, ETC especially when more requirements come out for newer versions.

How to remove a dead vCenter Linked Mode

If you have a vCenter that was dead, removed, or only not in use anymore but was in linked mode, you will receive warnings every time you open the master vCenter, so in this blog post, we will explain how to remove a dead vCenter Linked Mode.

Has we can see in the next image, in one part, we have the warning regarding an old vCenter that is set to linked mode with this vCenter, but in the next, in the Linked vCenter Server Systems tab, we don’t any vCenter added, and the list is empty.

Warnings

How to remove a dead vCenter Linked Mode

In this case, it was an old vCenter that was never removed, and the master was upgraded some times until version 6.7, but always had this dead link attached to it.

Login to your vCenter console to check what links or registers are enabled to this vCenter.

How to remove dead vCenter Linked Mode.

First, we check if this vCenter has an external PSC using: /usr/lib/vmware-vmafd/bin/vmafd-cli get-ls-location –server-name localhost

Next, is to list all the nodes that are register in this vCenter using: /usr/lib/vmware-vmafd/bin/dir-cli nodes list

sso-user@vcenter [ ~ ]$ /usr/lib/vmware-vmafd/bin/dir-cli nodes list
Enter password for administrator@vsphere.local:
Node: vcenter.york.local
Type: PSC
Site: default-site
Partner #1: ldap://192.168.2.32

Node: 192.168.2.32
Type: PSC
Site: Default-First-Site
Partner #1: ldap://vcenter.york.local
 
root@vcenter [ ~ ]#

As we can notice, the vCenter (vcenter.york.local) that we have a warning is still listed in the nodes. So we need to remove that node from the vCenter and break the linked mode between this vCenter and the dead one.

Next, we need to run the command to unregister this vCenter, using: cmsso-util unregister –node-pnid 192.168.2.32 –username administrator@vsphere.local

Note: Before running this command, beware that this will restart your vCenter services, and vCenter will be unavailable during the process.

root@vcenter [ /var/lib/sso-user ]# cmsso-util unregister --node-pnid 192.168.2.32  --username administrator@vsphere.local
Password:
Solution users, computer account and service endpoints will be unregistered
2021-12-05T16:25:23.263Z  Running command: ['/usr/lib/vmware-vmafd/bin/dir-cli', 'service', 'list', '--login', 'administrator@vsphere.local']
2021-12-05T16:25:23.310Z  Done running command
Stopping all the services ...
All services stopped.
Starting all the services ...
Started all the services.
Success
 
root@vcenter [ ~ ]#

Check again the vCenter node list and the vCenter is removed.

sso-user@vcenter [ ~ ]$ /usr/lib/vmware-vmafd/bin/dir-cli nodes list
Enter password for administrator@vsphere.local:
Node: vcenter.york.local
Type: PSC
Site: default-site
 
root@vcenter [ ~ ]#

For the safe side, I rebooted the vCenter, and now the warning is gone, and all is green.

I found this information helpful when rectifying my own issue with a stall vCenter linked environment. Credit to Luciano Patrao.

Toggling the vCenter Server Appliance default shell

Switching the vCenter Server Appliance 6.x to BASH Shell

  1. Log in to the vCenter Server Appliance through SSH.
  2. Run this command to enable access the Bash shell:

    shell.set –enabled true
     
  3. Type shell and press Enter.
  4. In the temporary BASH shell, run this command to permanently configure the default Shell to BASH for Root:

    chsh -s /bin/bash root
     
  5. Log out from the BASH Shell.
  6. Log in again for the changes to take effect.